| Foaming & Sanitizing Chemical Concentrates |
| Water to Fill Tank | |
| Water Usage Rates: | |
| Foam | 0.5 GPM |
| Rinse | 1.5 GPM |
| Sanitize | 0.5 GPM |
| Hose | 3/8'' x 15' |
| Nozzles | |
| Foam | #10 Bullet Foam Nozzle |
| Rinse | 2510 |
| Sanitize | 2510 |
Requirements
| Foaming & Sanitizing Chemical Concentrates |
| Water to Fill Tank | |
| Water Usage Rates: | |
| Foam | 0.5 GPM |
| Rinse | 1.5 GPM |
| Sanitize | 0.5 GPM |
| Hose | 3/8'' x 15' |
| Nozzles | |
| Foam | #10 Bullet Foam Nozzle |
| Rinse | 2510 |
| Sanitize | 2510 |
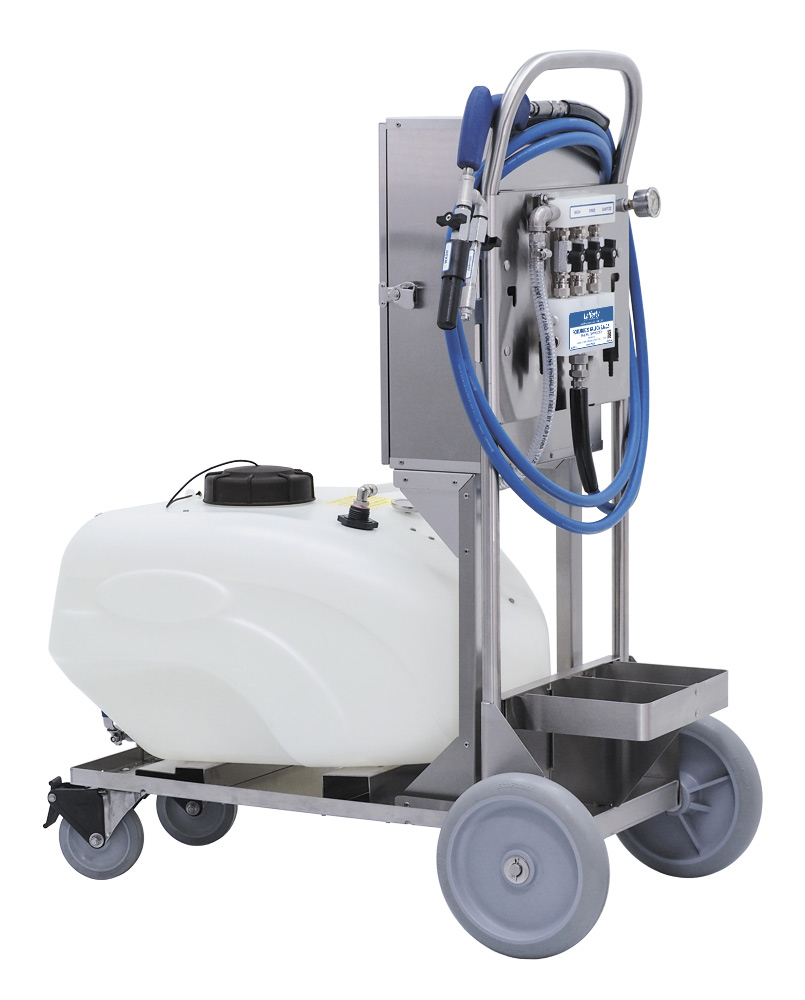
Overview
Safety & Operational Precautions
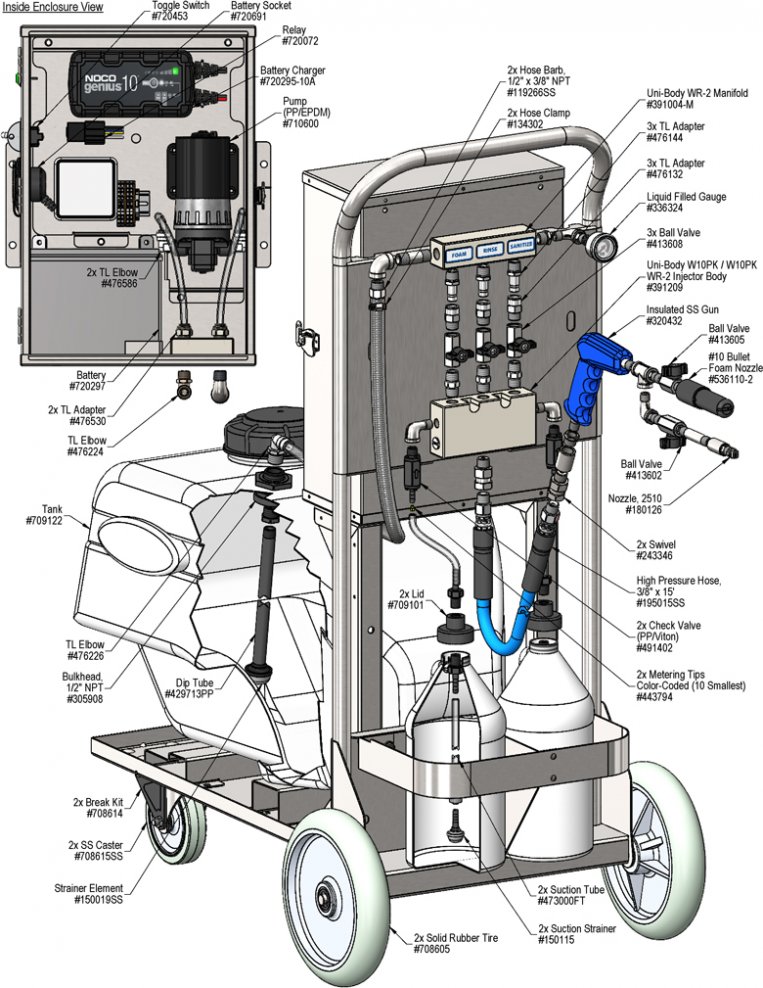
To Install (refer to diagram on next page)
Set the chemical dilution ratio by threading one of the color coded metering tips into each chemical check valve. See chemical labels for dilution ratio recommendation or consult your chemical supplier.
To Operate
WHEN FINISHED -- ALWAYS flip the switch "OFF" and open and close one of the ball valves on combo gun to release pressure in hose. Empty tank completely and recharge after EACH use.
NOTE: ALWAYS ENSURE THAT POWER LIGHT NEXT TO SWITCH IS OFF WHEN SYSTEM IS NOT BEING USED.
Metering Tip Selection |
||||
|---|---|---|---|---|
Metering Tip Color |
oz / Min |
Dilution Ratio @ 70 PSI |
||
| Foam | rinse | Sanitize | ||
|
Brown |
0.56 | 126:1 | - | 126:1 |
|
Clear |
0.88 | 80:1 | - | 80:1 |
|
Bright Purple |
1.38 | 51:1 | - | 51:1 |
|
White |
2.15 | 33:1 | - | 33:1 |
|
Pink |
2.93 | 24:1 | - | 24:1 |
|
Corn Yellow |
3.84 | 18:1 | - | 18:1 |
|
Dark Green |
4.88 | 14:1 | - | 14:1 |
|
Orange |
5.77 | 12:1 | - | 12:1 |
|
Gray |
6.01 | 12:1 | - | 12:1 |
|
Light Green |
7.01 | 10:1 | - | 10:1 |
| No Tip Ratio Up To: | 8.0:1 | - | 8.0:1 | |
| The dilution ratios above are approximate values. Due to chemical viscosity, actual dilution ratios may vary. | ||||
|
Formula |
||||
|
GPM × 128 ÷ Desired Dilution Ratio = oz/min
|
||||
unit Flow Rates |
|||
|---|---|---|---|
| Pressure | Water Flow GPM | ||
| PSI | Foam | Rinse | Sanitize |
| 70 | 0.55 | 1.50 | 0.55 |
Troubleshooting Guide |
|---|
| Problem | Possible Cause / Solution | |
|---|---|---|
| Startup | Maintenance | |
| A) Unit will not draw chemical. B) Using too much chemical. C) Foam/spray does not clean/perform. D) Water back flowing into chemical | 1, 2, 3, 4, 5 7 6, 8 |
9, 11, 12, 13, 14, 15, 16 12, 13, 14, 16 9 |
| Possible Cause / Solution | |
|---|---|
| Startup | Maintenance |
|
|
PREVENTIVE MAINTENANCE: When the unit will be out of service for extended periods, place chemical tube(s) in water and flush the chemical out of the unit to help prevent chemical from drying out and causing build-up. Periodically check and clean chemical strainer and replace if missing. |