Lafferty Equipment Manufacturing, LLC

Installation & Operation Instructions

Model # 969775 · Portable Model 20 SS Bypass 2-Way Airless Foam/Rinse/Spray System

Requirements

Chemical Concentrate
Water
Temperature up to 180°F
Pressure 400 to 2500 PSI
Flow 3.72 GPM @ 1000 PSI
Supply Line 3/8"
Hose 3/8" ID x 50'
Nozzle 2520 or A-20SS Airless Foam Wand

Options

Square Jug Rack Conversion
Specify Round or Square Jug Racks at time of order
5 Gallon Pail
Pail, 5 Gallon Round W/ Suction Stem# 709105
Inlet Jumper Hose (Stainless Steel Fittings)
Hose, 3/8" x 15', SS, BNM, High Pressure# 195015SS
Quick-Connect Set
QD, SS, Socket, 3/8" FPT# 350446
QD, SS, Plug, 3/8" MPT# 350450
969775
Warning! Read All Instructions Before Using Equipment!

Overview

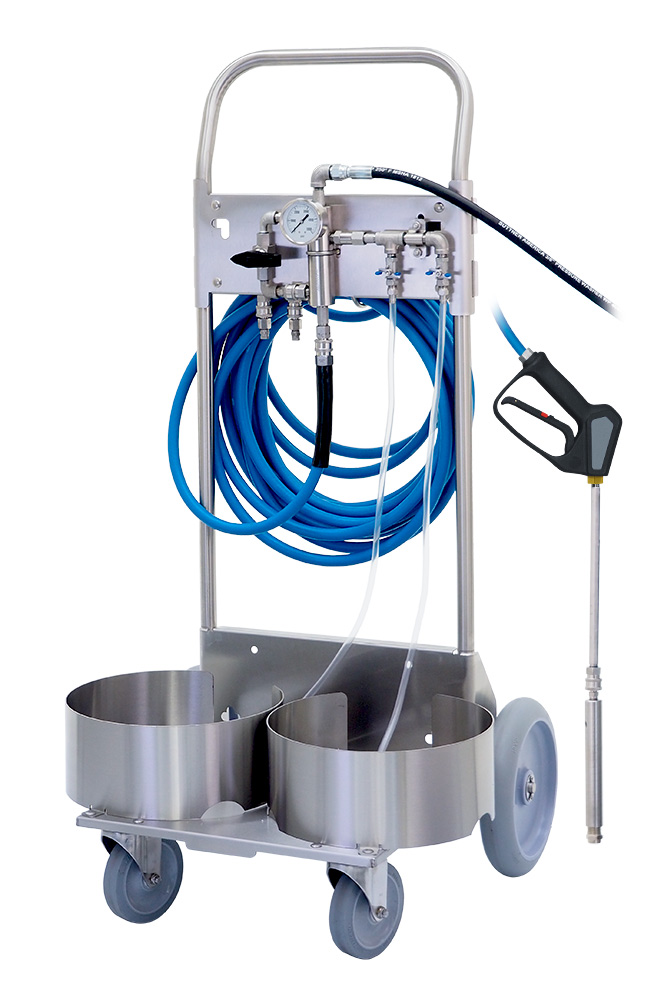
The Portable Model 20 SS Bypass 2-Way Airless Foam/Rinse/Spray System is a venturi dilution system for high water pressure that applies chemical as wet airless foam or liquid spray, and rinses through a single hose.  Quick disconnects enable switching between the foam wand, spray nozzle and rinse nozzle.  Open the bypass ball valve to rinse at full pressure.  This 2-Way unit dilutes two separate chemicals or two different concentrations of the same chemical.

Safety & Operational Precautions

  • For proper performance do NOT modify, substitute nozzle, hose diameter or length.
  • Manufacturer assumes no liability for the use or misuse of this unit.
  • Wear protective clothing, gloves and eye wear when working with chemicals.
  • Always direct the discharge away from people and electrical devices.
  • Follow the chemical manufacturer's safe handling instructions.

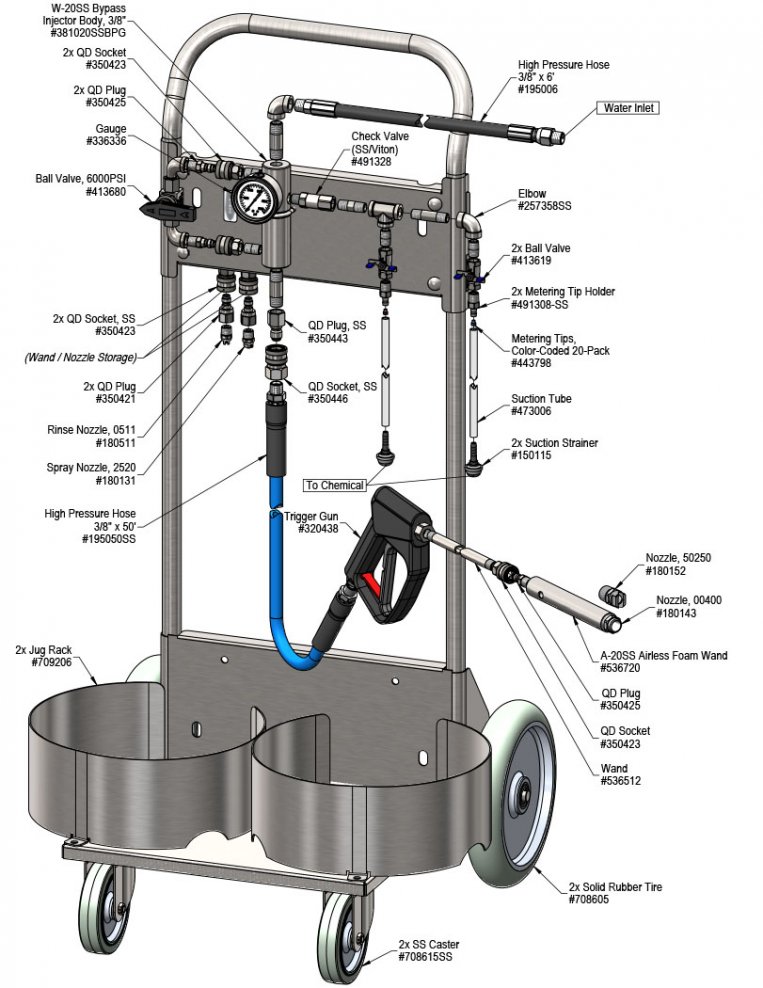
To Install (refer to diagram on next page)

  1. Place a container of chemical concentrate in the jug rack(s).
  2. Connect the hose(s) as shown in the diagram.
  3. To prevent blocking the small water jets in the injector flush any new plumbing of debris before connecting water.
  4. Connect water supply. If water piping is older or has known contaminants, install a water filter.

Set the chemical dilution ratio by threading one of the color coded metering tips into each chemical check valve. See chemical labels for dilution ratio recommendation or consult your chemical supplier.

  • For the strongest dilution ratio do NOT install a colored metering tip.
  • The dilution ratios in the metering tip chart are based on water thin chemicals with a viscosity of 1CPS.
  • Thicker chemicals will require a larger tip than the ratios shown in the chart.
  • Application results will ultimately determine final tip color.
  • Select the tip color that is closest to your desired chemical strength and thread it into the tip holder. DO NOT OVER-TIGHTEN.
  • Push the chemical tube over the check valve barb and place the suction tube in the chemical concentrate.
  • If necessary, cut suction tube(s) to length before attaching suction strainer.

To Operate

TO FOAM OR SPRAY

  1. Quick connect the foam wand or spray nozzle to the trigger gun as shown in the diagram.
  2. Turn the bypass ball valve to the "chemical" position (black handle is horizontal).
  3. Open one chemical ball valve.
  4. Hold the trigger gun firmly and direct the discharge in a safe direction. Pull the trigger and begin application.
  5. Make final metering tip adjustments based on application results. Try the next larger sized metering tip until the results are acceptable.
  6. Close chemical ball valve and repeat step 3 for additional chemicals.

NOTE:  The flow rate, foam throw distance, and coverage speed varies based on the incoming water pressure.   Higher pressure = higher flow rate, faster coverage, and further distance.  See flow chart.


TO RINSE

  1. When foaming/spraying is completed, release the trigger.
  2. Replace the airless foam wand or spray nozzle with the included rinse nozzle (or other rinse nozzle).
  3. Close the chemical ball valves, and open the bypass ball valve (black handle is vertical).
  4. Rinse the work surface as you normally would before the chemical dries.
  5. If the unit will not be used for a period of time, it is best to draw fresh water through the pickup tube(s) to prevent chemical from drying inside the components.

TIP:  For higher volume rinsing with the bypass valve open, use the chemical spray nozzle instead of a high pressure rinse nozzle.

Metering Tip Selection

Metering Tip Color
OZ/MIN
Dilution Ratio
@ 1000 PSI
Brown
0.56850:1
Clear
0.88541:1
Bright Purple
1.38345:1
White
2.15221:1
Pink
2.93162:1
Corn Yellow
3.84124:1
Dark Green
4.8897:1
Orange
5.7782:1
Gray
6.0179:1
Light Green
7.0168:1
Med. Green
8.0659:1
Clear Pink
9.4350:1
Yellow Green
11.5041:1
Burgundy
11.9340:1
Pale Pink
13.8734:1
Light Blue
15.1431:1
Dark Purple
17.8827:1
Navy Blue
25.3619:1
Clear Aqua
28.6017:1
Black
50.0010:1
No Tip Ratio Up To:7:1
The dilution ratios above are approximate values. Due to chemical viscosity, actual dilution ratios may vary.

Formula

GPM × 128 ÷ Desired Dilution Ratio = oz/min

  • See Unit Flow Rates chart for GPM
  • Use 20 for 20:1 dilution ratio, 30 for 30:1, etc.
  • Match calculated ounces per minute (oz/min) to nearest oz/min in Metering Tip Selection chart.

Unit Flow Rates

PSIGPM
4002.35
5002.63
6002.88
7003.11
8003.32
9003.53
10003.72
11003.90
12004.07
13004.24
14004.40
15004.55
16004.70
17004.85
18004.99
19005.12
20005.26
21005.39
22005.51
23005.64
24005.76
25005.88
969775.jpg
Troubleshooting Guide
Problem Possible Cause / Solution
StartupMaintenance
A) Unit will not draw chemical.
B) Does not foam properly
C) Using too much chemical
1, 2, 3, 7
1, 4, 5, 7
6
8, 9, 10, 11, 12, 13
8, 9, 11, 12
Possible Cause / Solution
StartupMaintenance
  1. Water volume too low
    • See requirements.
  2. Water inlet clogged
    • Clean the water inlet. DO NOT DRILL OUT
  3. Hose size too small
    • MUST be 3/8" ID hose, minimum
  4. Ensure chemical is recommended for foaming and/or the application
    • Refer to chemical manufacturer.
  5. Dilution too weak / Chemical is very thick.
    • Install larger metering tip or remove metering tip.
  6. Dilution too strong / No metering tip installed or wrong metering tip installed
    • Install a metering tip or install a smaller metering tip
    • If the exact dilution ratio cannot be achieved with metering tips, pre-dilute the chemical with water before drawing it into the injector for final dilution and application
  7. Hose too long
    • Use a shorter discharge hose to alleviate back pressure on the injector
    • The allowable length of hose varies based on individual pressure washers and equipment setups. 200' max recommended hose length between injector and nozzle. Longer hose could affect dilution ratios.
  1. Chemical check valve stuck, clogged, loose or failed
    • Clean, tighten or rebuild.
  2. Chemical strainer or metering tip blocked
    • Clean or replace chemical strainer and/or metering tip.
  3. Chemical tube stretched out where tube slides over check valve or pin hole/cut in chemical tube (sucking air in) which reduces chemical intake. Chemical tube not immersed in chemical or depleted.
    • Cut off end of tube, replace tube or immerse tube in chemical
  4. Discharge nozzle is wrong size
    • Install correct nozzle (see parts drawing)
    • Use only provided nozzles/wands for chemical application
  5. Chemical build-up or hard water scale may have formed in the foam wand or injector body causing poor or no chemical pick-up
    • Follow Preventive Maintenance instructions below, using hot water and/or descaling acid. When there is no draw at all, carefully remove inlet fitting and chemical check valve. Soak injector body and or foam wand in de-scaling acid.
  6. Bypass ball valve open (Bypass models only)
    • Close bypass valve.
PREVENTIVE MAINTENANCE: When the unit will be out of service for extended periods, place chemical tube(s) in water and flush the chemical out of the unit to help prevent chemical from drying out and causing build-up. Periodically check and clean chemical strainer and replace if missing.