Lafferty Equipment Manufacturing, LLC

Installation & Operation Instructions

Model # 985103 · 1-Way Hands-Free Mixing Station

Requirements

Chemical Concentrate
Water
Temperature up to 160°F
Pressure 25-125 PSI
Supply Line 1/2" Minimum
Flow
High Flow (Black Injector) 4.0 - 7.3 GPM
Low Flow (White Injector)  1.9 - 3.4 GPM
Bottle Fill (Blue Injector) 0.6 - 1.0 GPM

Options

Stainless Steel Jug Racks
1 Gallon Round/Square# 224200
1 Gallon Round/Square Locking# 224200-L
2 ½ Gallon (8 ½" x 10 ½")# 224210
5 Gallon Round/Square Locking (12" x 12")# 224214
5 Gallon Round/Square (12" x 12")# 224215
Jumper Hose with GH Fittings (10')
GH Hose, Blue, 1/2" x 10'# 804410B
Safe Flow Lid™ for 1 Gallon Jugs
Lid, Suction Tube, and Strainer# 709101
Alternate Chemical Check Valve - EPDM Standard
Check Valve, Chemical, PP, 1/4" (Viton)# 491402
985103
Warning! Read All Instructions Before Using Equipment!

Overview

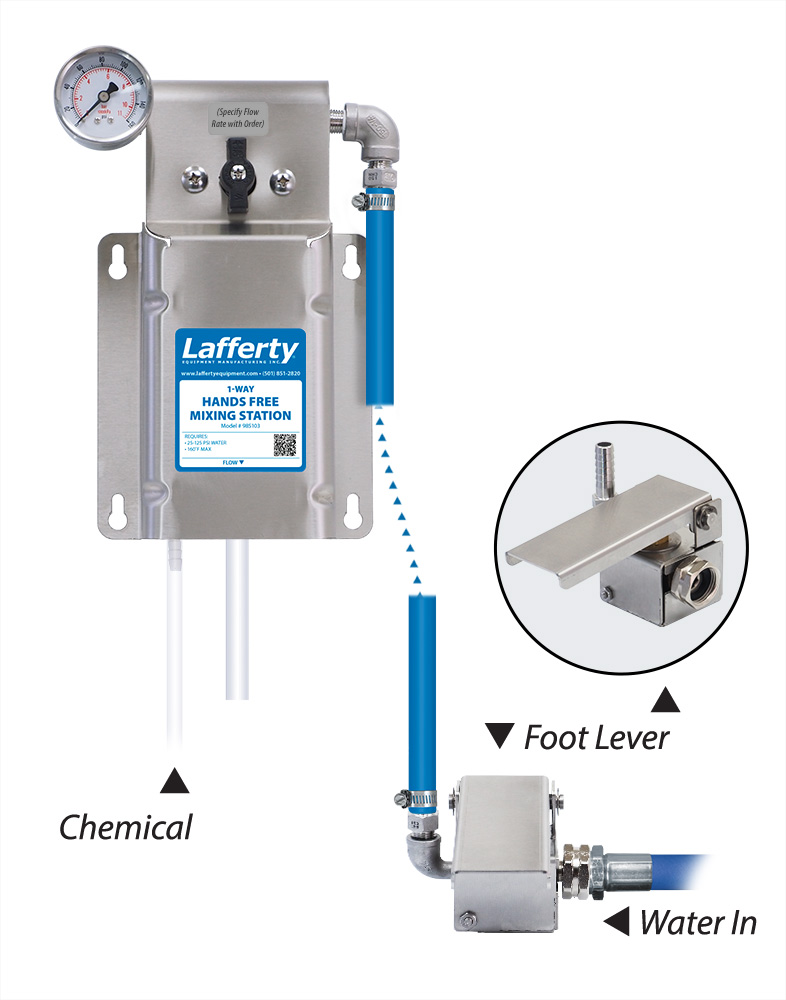
The 1-Way Hands-Free Mixing Station is a foot-lever-activated venturi chemical proportioner that accurately dilutes chemical to the required ratio and dispenses into any size container. When the foot lever is depressed, this system uses city water pressure (25 - 125 PSI) to draw and blend chemical concentrate into the water stream. The dilution ratio is set using the included precision metering tips. Choose a factory-set flow rate at the time of order (Bottle Fill, Low Flow or High Flow).

Safety & Operational Precautions

  • For proper performance do NOT modify hose diameter or length.
  • Do NOT attempt to install a discharge ball valve.
  • Manufacturer assumes no liability for the use or misuse of this unit.
  • When connecting to a potable water supply follow all local codes for backflow prevention.
  • WARNING: Contamination of your potable water supply can occur without proper backflow prevention.
  • Wear protective clothing, gloves and eye wear when working with chemicals.
  • Always direct the discharge away from people and electrical devices.
  • Follow the chemical manufacturer's safe handling instructions.
  • Never use chemicals that could be dangerous if accidentally mixed.

Installation for Devices Plumbed to a Faucet with a Vacuum Breaker

  • This equipment features an integrated hose connection vacuum breaker.
  • In cases where an installation involves a water source coming from a faucet with an integrated vacuum breaker device conforming to ASSE 1001 or ASSE 1011, a pressure bleed device conforming to IAPMO PS-104 shall be used to protect the vacuum breaker device.
  • The purpose is so that continuous pressure does not adversely affect the vacuum breaker device upstream of the pressure bleed device. This also protects against a cross-connection between hot and cold water migration by encouraging the user to turn off the water supply at the faucet.

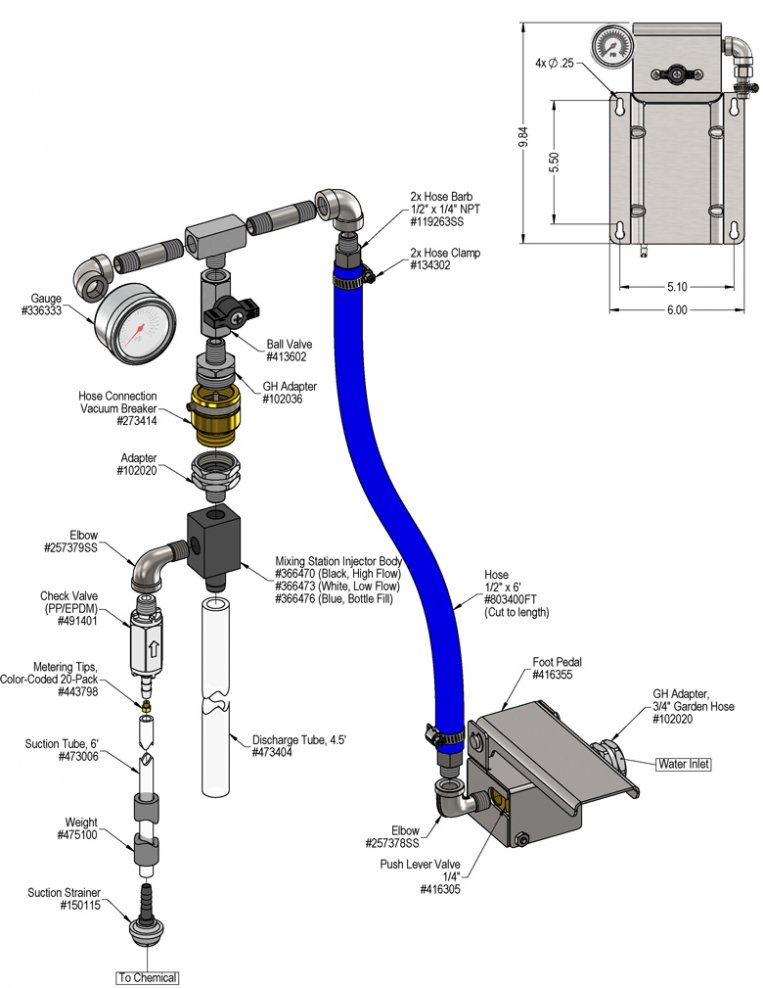
To Install (refer to diagram on next page)

  1. Attach discharge tube(s) to mixing station (see diagram).  Discharge tube(s) can be cut to length as needed.
  • NOTE: Do not install a shutoff or flow restriction device on end of discharge tube (valve, trigger, nozzle, etc.) This unit is designed for open flow dispensing.
  1. Mount to suitable surface above the chemical to prevent siphoning. Use suitable fasteners based on the mounting surface and system weight. See diagram for mounting hole size and spacing.
  2. Select and install metering tip and suction tube by following instructions below TO SET DILUTION RATIO.
  3. Immerse chemical suction tube with strainer into container of chemical concentrate.

FOOT LEVER INSTALLATION - See diagram

  1. Securely mount the foot lever mounting base in a convenient location on the floor, wall, or any flat surface using the mounting holes provided (mounting hardware not included).  Allow proper clearance for the assembled foot lever and the user's foot.
  2. Slide the upper assembly onto the mounting base and secure with nut on front of lever housing. 
  3. A 6' hose with 2 clamps are provided to connect each foot valve discharge hose barb to a Mixing Station inlet barb. Cut the hose(s) to the length needed.  See diagram.
  4. Connect your 25-125 PSI water supply to the included garden hose inlet or connection of your choice.
  5. Always use the included washer with screen on the unit inlet or provide a water strainer of your choosing.
  6. Open ball valve(s) on mixing station.
  7. The foot lever(s) now controls mixing station activation.

TO SET DILUTION RATIO, thread a color-coded metering tip into each tip holder. See chemical labels for dilution ratio recommendation or consult your chemical supplier.

  • For the strongest dilution ratio do NOT install a colored metering tip.
  • The dilution ratios in the metering tip chart are based on water thin chemicals with a viscosity of 1CPS. Thicker chemicals will require a larger tip than the ratios shown in the chart.
  • Chart shows ratios at 40 PSI water pressure. Actual water pressure is shown on unit gauge during operation. Adjust metering tip selection based on actual water pressure using the online Metering Tip Calculator or the math formula shown in the chart.
  • Select and thread the tip color that is closest to your desired chemical strength into the tip holder.  DO NOT OVER-TIGHTEN
  • Application results will ultimately determine final tip color selection.
  • Push the chemical tubes over the tip holders and place the strainer in the chemical concentrate.
  • If necessary, cut suction tube(s) to length.

To Operate

  1. Completely open the inlet ball valve for the foot lever to be used. Do not press foot lever yet.
  2. Hold (do not release) the discharge tube inside the container to be filled and completely depress the foot lever.  For units with multiple foot levers, only use one at a time.
  3. When container is filled to the desired level, release the lever, keeping the discharge tube in the container until it completely drains.
  4. Make final metering tip adjustments based on application results. Try the next larger sized metering tip until the results are acceptable.

IMPORTANT: Closing the mixing station ball valve(s) will prevent activation by foot lever. Ball Valve(s) should be closed when unit will be out of service for extended periods as a safeguard.

Metering Tip Selection

Metering Tip Color
OZ/MIN
Dilution Ratio
@ 40 PSI
High FlowLow FlowBottle Fill
Brown
0.561031:1480:1142:1
Clear
0.88656:1305:190:1
Bright Purple
1.38418:1195:158:1
White
2.15269:1125:137:1
Pink
2.93197:192:127:1
Corn Yellow
3.84150:170:121:1
Dark Green
4.88118:155:116:1
Orange
5.77100:147:114:1
Gray
6.0196:145:113:1
Light Green
7.0182:138:111:1
Med. Green
8.0672:133:110:1
Clear Pink
9.4361:129:18:1
Yellow Green
11.5050:123:17:1
Burgundy
11.9348:123:17:1
Pale Pink
13.8742:119:16:1
Light Blue
15.1438:118:15:1
Dark Purple
17.8832:115:14:1
Navy Blue
25.3623:111:13:1
Clear Aqua
28.6020:19:13:1
Black
50.0012:15:1—
No Tip Ratio Up To:4.8:13.5:11.7:1
The dilution ratios above are approximate values. Due to chemical viscosity, actual dilution ratios may vary.

Formula

GPM × 128 ÷ Desired Dilution Ratio = oz/min

  • See Unit Flow Rates chart for GPM
  • Use 20 for 20:1 dilution ratio, 30 for 30:1, etc.
  • Match calculated ounces per minute (oz/min) to nearest oz/min in Metering Tip Selection chart.

Unit Flow Rates

PSIGPM
High FlowLow FlowBottle Fill
354.221.960.58
404.512.100.62
505.042.350.69
605.522.570.76
705.972.780.82
806.382.970.88
906.773.150.93
1007.133.320.98
1107.483.481.03
1207.813.641.07
1257.973.711.10
985103.jpg
Troubleshooting Guide
Problem Possible Cause / Solution
StartupMaintenance
A) Unit will not draw chemical.
B) Dilution too weak.
C) Dilution too strong
D) Water backing up into chemical container.
E) Vacuum breaker constantly dripping / leaking.
1, 2, 3
4
5
6, 7, 8, 9, 10, 11
11

8
12, 13
Possible Cause / Solution
StartupMaintenance
  1. Water pressure too low or water temperature too high
    • See requirements.
  2. Push lever not completely depressed or mixing station ball valve not fully open.
    • Completely depress the push lever.
    • Completely open the ball valve on the mixing station.
  3. Chemical tube not immersed in chemical or chemical depleted
    • Immerse tube or replenish.
  4. Metering tip too small
    • Install larger metering tip.
  5. No metering tip installed or metering tip too large
    • Install smaller metering tip.
  1. Water inlet strainer screen clogged
    • Disconnect water and clean the screen.
  2. Chemical strainer or metering tip partially blocked
    • Clean or replace chemical strainer and/or metering tip.
  3. Check valve stuck or failed
    • Clean or replace.
  4. Vacuum leak in chemical pick-up connections
    • Tighten the connection.
  5. Chemical tube stretched out where tube slides over metering tip holder or pin hole/cut in chemical tube (sucking air in)
    • Cut off end of tube or replace tube.
  6. Water scale or chemical build-up may have formed in the body causing poor or no chemical pick-up
    • Follow Preventive Maintenance instructions below, using hot water and/or descaling acid. When there is no draw at all, carefully remove fittings and soak entire body in descaling acid.
  7. Vacuum breaker fouled or failed
    • Replace vacuum breaker. 
    • Install filter on water supply line.
  8. Vacuum breaker experiencing backpressure
    • The vacuum breaker(s) will vent water when experiencing backpressure that cannot exist under normal operating conditions.
    • Do not exceed maximum water pressure.  See requirements.
    • Do not modify discharge assembly, attach shutoff valve, or otherwise restrict flow from unit discharge.
    • Descale injector body if necessary.
PREVENTIVE MAINTENANCE: When the unit will be out of service for extended periods, place chemical tube(s) in water and flush the chemical out of the unit to help prevent chemical from drying out and causing build-up. Periodically check and clean chemical strainer and replace if missing.