Lafferty Equipment Manufacturing, LLC

Installation & Operation Instructions

Model # 976100-PD · Timed Air Pump PD Entryway Foam Sanitizer

Requirements

Ready-to-Use Chemical Solution
Compressed Air up to 7 CFM
Minimum Air Supply Line 3/8"
Hose 3/4" ID x 25'
Nozzle Spreader Nozzle
Electric 120V

Options

Level Masters Provide an Automatic Supply
of Ready-to-Use Chemical
Level Master (Various Tank Sizes)# 989304
Gemini Level Master (Various Tank Sizes)# 989316

Weight & Dimensions

Single Package
Shipping Weight47 lbs.
Shipping Dimensions34" x 29" x 11"
976100-PD
Warning! Read All Instructions Before Using Equipment!

Overview

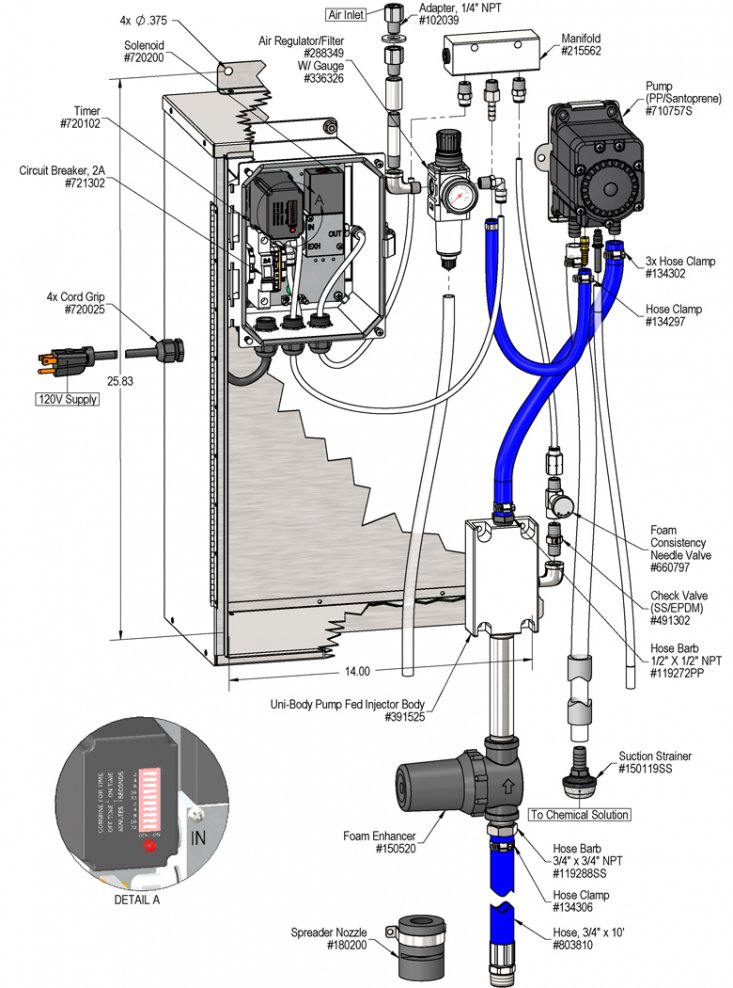
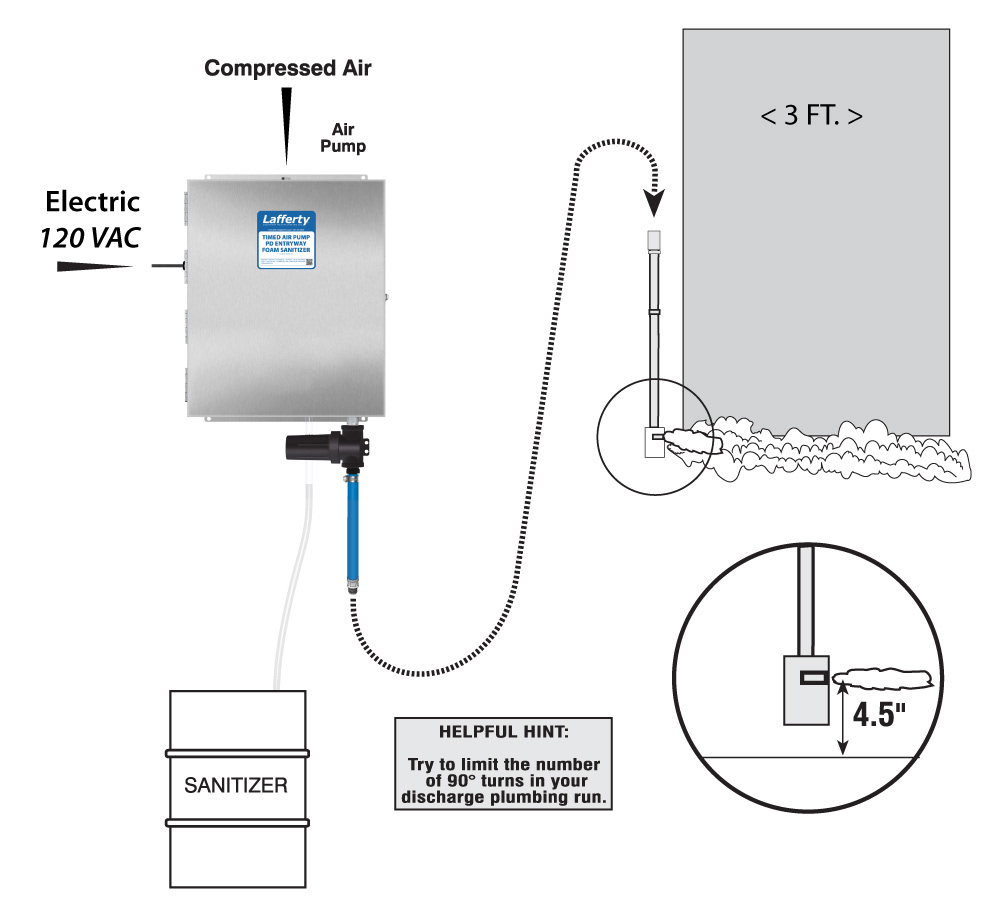
The Timed Air Pump PD Entryway Foam Sanitizer is an automated foam applicator for projecting sanitizing chemicals on to floors of 3' wide employee walk doors to prevent cross contamination. Ideal for use in locations where water pressure is unreliable, ready to use chemical solution is drawn by an air operated pump and pressurized through a Pump Fed Foamer body. Rich, clinging foam is created by injecting compressed air into the solution to greatly increase volume and coverage ability. Foam is then projected through the discharge hose and Spreader™ nozzle. The system timer is user-programmable to meet the needs of any facility.

Safety & Operational Precautions

  • See Additional Safety Precautions included with the Electrical Control Box Installation Information
  • Always consider electrical shock hazard when working with and handling electrical equipment. If uncertain, consult an Electrician. Electrical wiring should only be done by a qualified Electrician, per Local and State Electrical Codes.
  • For proper performance do NOT modify, substitute nozzle, hose diameter or electrical control box.
  • Manufacturer assumes no liability for the use or misuse of this unit.
  • Wear protective clothing, gloves and eye wear when working with chemicals.
  • Always direct the discharge away from people and electrical devices.
  • Follow the chemical manufacturer's safe handling instructions.
  • NEVER mix chemicals without first consulting chemical manufacturer.
  • Disconnect electrical power to the control box prior to opening it.

To Install (refer to diagram on next page)

  1. Mount the unit to a suitable surface near the entryway.
  2. See Page 1 for proper installation layout.
  3. You can use either the supplied 10' section of hose to connect the foamer to 3/4" pipe or use 3/4" ID pipe only. Use as few elbows as possible. Minimum length of the total hose/pipe is 25'.
  4. Connect and mount the spreader nozzle slot at around  4-5” off the floor.
  5. Connect compressed air to the unit.
  6. Immerse chemical pick-up tube strainer in a tank of RTU chemical solution.

To Operate

TO TEST

  1. Plug the power cord into 120 VAC outlet.
  2. The unit has been tested and the timer is preset to run for 60 seconds to allow for final adjustments. (ON TIME will activate first.) Open your water supply valve and allow the internal float tank to completely fill.
  3. Turn on the air supply valve, and then turn on the power switch.
  4. The unit will activate, the pump should be priming, the chemical will start to draw in a few seconds.
  5. Final air adjustments will now have to be made.
  6. Wait a few seconds and observe foam consistency.
    • To adjust foam consistency pull out on the air regulator knob, turn slightly clockwise for dryer foam and counterclockwise for wetter foam. Wait a few seconds to see each adjustment.
    • Once this is set and desired foam consistency is achieved push lock the knob. You are ready to start.

TIMER ADJUSTMENT

  1. CAUTION! UNPLUG THE POWER CORD! Then open control box and adjust the timer. The ON TIME dip switches control how long the foam will be applied. The OFF TIME dip switches control how long the unit will stay off between foam applications. Add up the seconds for each activated dip switch to arrive at the desired duration of the ON cycle. Usually 8-10 seconds is sufficient to foam the floor (longer plumbing runs will require a longer application cycle). Add up the minutes for each activated dip switch to arrive at the desired duration of the OFF cycle. Set your OFF TIME to maintain the foam’s presence according to your flow (anywhere from 6 to 15 minutes).
  2. Close control box and plug in the power cord. Turn on the power switch. The unit will now function according to the timer settings. (ON TIME will activate first.)
  • Note: The unit will run 24 hours a day unless the power switch is manually turned off.
  • For extra foam at any time, press and hold the lower end (Momentary control) of the door switch. (See Switch Settings, below.)
SWITCH SETTINGS
  • Automatic control – Top of switch is depressed. Green light glows.
  • OFF – Switch is in middle position; green light is off
  • Momentary control – Press bottom of switch. Unit is active only while switch is pressed. When released, the switch returns to the OFF position.

Unit Flow Rates

PSIGPM
601.64
976100-PD.jpg
Troubleshooting Guide
Problem Possible Cause / Solution
StartupMaintenance
A) Air pump will not pump or runs with no output.
B) Foam surges.
C) Foam output too wet.
D) Foam output too dry.
E) Unit doesn't come on when switch is turned on.
F) Unit comes on and runs continuously.
1, 2, 4, 7
1, 2, 3, 4, 5, 6
1, 2, 3, 4, 5, 6
2
8, 9, 12, 13
9
9

12, 13
12, 13
Possible Cause / Solution
StartupMaintenance
  1. Air ball valve partially closed or air pressure too low.
    • Completely open air inlet ball valve air pressure should be set at 60-80 PSI.
  2. Foam consistency needle valve open too much
    • Adjust the needle valve slowly clockwise until foam stabilizes. Turn round handle slightly clockwise for wetter foam; open counterclockwise for dryer foam. Open a maximum of 1 turn.
  3. Discharge hose/pipe too long or wrong size
    • ​​​​​​​MUST use at least 10' of 3/4" hose or pipe. 25' is ideal, 40' maximum.
  4. Solution tube not completely immersed in chemical solution or container empty
    • ​​​​​​​Immerse tube or replenish chemical.
  5. Dilution too weak
    • ​​​​​​​Add more chemical to solution container.
  6. Improper chemical
    • ​​​​​​​Ensure product is recommended for foaming.
  7. Ice particles from condensation in air line — Air pump can periodically "freeze up” (stall) due to ice particles in the pump's exhaust (depending on air humidity & other factors)
    • ​​​​​​​​​​​​​​WAIT several seconds to allow the ice particles to melt and blow out, at which time the pump will automatically resume pumping.
  1. Solution strainer blocked
    • Clean or replace
  2. Air regulator failed
    • ​​​​​​​Clean or replace
  3. Nozzle has been changed or missing
    • ​​​​​​​See REQUIREMENTS.
  4. Problem with air pump
    • ​​​​​​​Refer to air pump instruction manual. Replace pump.
  5. May have electrical problems
    • ​​​​​​​Have a qualified electrician check for problems.
  6. Timers not set properly or malfunctioned
    • ​​​​​​​See TIMER ADJUSTMENT on page 2 or replace timers.
PREVENTIVE MAINTENANCE: When the unit will be out of service for extended periods, place chemical tube(s) in water and flush the chemical out of the unit to help prevent chemical from drying out and causing build-up. Periodically check and clean chemical strainer and replace if missing.