Lafferty Equipment Manufacturing, LLC

Installation & Operation Instructions

Model # 933602-COIN · Coin Operated 1-Way FPV-PD Concrete Foamer

Requirements

Ready-to-Use Chemical Solution
Compressed Air up to 6 CFM
Hose 3/4" ID x 50'
Nozzle 40150
Electric 120V / 10 A

Options

Stainless Steel Hose Racks
Large Stainless Steel Hose Rack# 224150
To Dilute and Dispense Ready-To-Use Acid Solution
414HC Acid Mixing Station# 980415
Drum & Tote Stick Lengths & Seal Materials
Drum Stick, 33" (Viton or EPDM)# 491643 / 491643-E
Drum Stick, 48" (Viton or EPDM)# 491648 / 491648-E
Drum Stick, 54" (Viton or EPDM)# 491645 / 491645-E
Tote Stick, 33" (Viton or EPDM)# 491653 / 491653-E
Tote Stick, 48" (Viton or EPDM)# 491654 / 491654-E
Tote Stick, 54" (Viton or EPDM)# 491656 / 491656-E
Additional Coins for Coin Acceptor
Coin, Use With Coin Acceptor Control Boxes# 720898

Weight & Dimensions

Single Package
Shipping Weight45 lbs.
Shipping Dimensions24" x 24" x 21"
933602-COIN
Acid_LC.jpg
Warning! Read All Instructions Before Using Equipment!

Overview

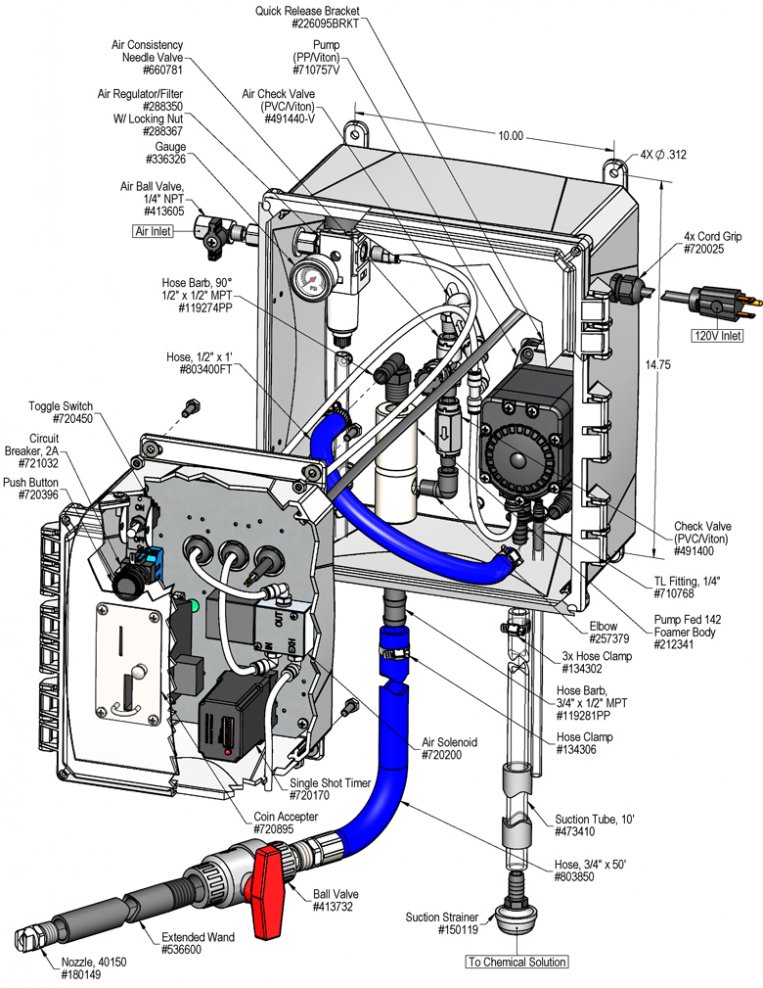
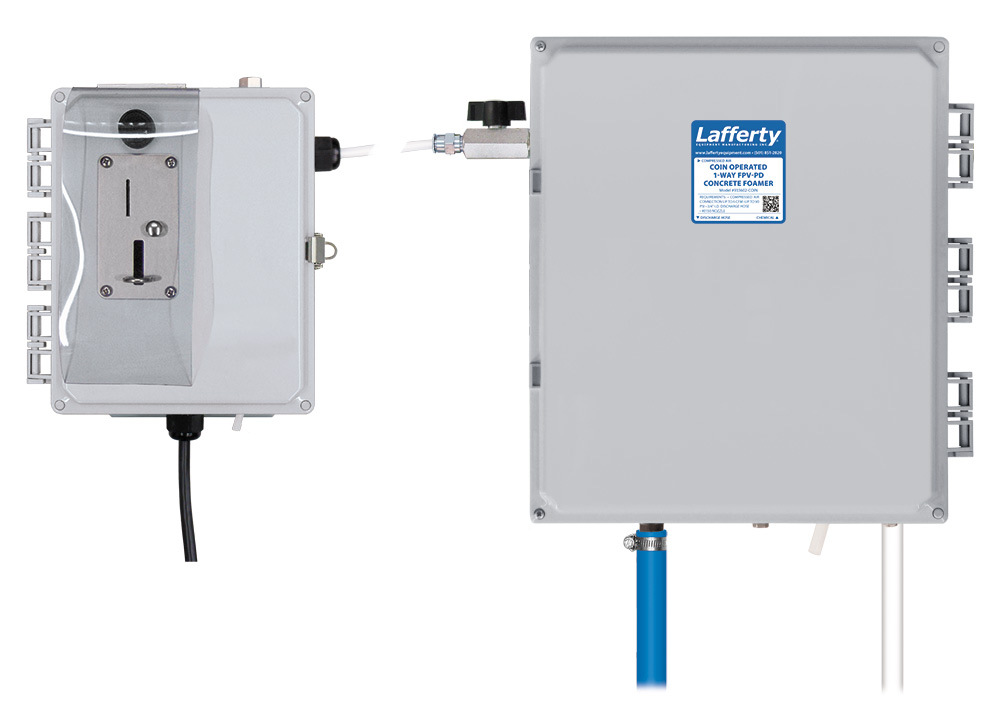
The Coin Operated 1-Way FPV-PD Concrete Foamer is a timed foam applicator for projecting highly corrosive chemicals such as those used to remove concrete and for aluminum brightening. This acid-resistant system uses a cost-effective Flojet air-operated, double-diaphragm pump to draw ready-to-use acid solution from a static tank and inject compressed air to greatly increase volume and coverage ability. Rich, clinging foam is projected through the hose, wand and fan nozzle on to any surface. This unit features an adjustable timer which controls the length of application, preventing costly over-application. A coin acceptor triggers the timer, which in turn controls the air solenoid for activation of the foamer. The timer can be set to operate the device for up to 17 minutes. The control box also includes a toggle switch and button which can be used to bypass the coin mechanism, if desired. 100 coins are included.

Safety & Operational Precautions

  • For proper performance do NOT modify, substitute nozzle, hose diameter or length
  • Manufacturer assumes no liability for the use or misuse of this unit.
  • Wear protective clothing, gloves and eye-wear when working with chemicals.
  • Always direct the discharge away from people and electrical devices.
  • Follow the chemical manufacturer’s safe handling instructions.
  • DO NOT use chemicals that are not compatible with Viton diaphragms.

To Install (refer to diagram on next page)

  1. Mount control box coin acceptor in convenient location near unit.
  2. Do NOT connect to electricity yet.
  3. Mount the unit above solution supply level to prevent siphoning.
  4. Place the strainer in the chemical solution(s).
  5. Attach the discharge hose.
  6. Connect control box to unit with 1/4" air tubing (provided tubing can be cut to length).
  7. Attach a compressed airline to the control box air inlet. DO NOT TURN ON.
  8. Air Filter/Dryer recommend.

SETTING THE TIMER

  1. Make sure the system is not plugged in to a power source. Remove control box cover. The box contains a single RUN timer.
    Run Timer: This timer allows you to set the length of time you want the unit to run each time the operator inserts a coin. Set the timer by completely pushing down the combination of dip switches that will equal the total number of seconds run time that you require. (Up to 17 minutes)
    Coin Override Note: The lockable control box includes a toggle switch which can be used to bypass the coin acceptor.  If toggle switch is set to ON, the unit is then activated by pushing the button located on the cover of the control box.  (i.e. If the facility runs out of coins and must continue using equipment.)
  2. Replace the control box cover.
  3. Plug the power cord into a 120 VAC power outlet. GFI recommended.
  4. Turn on your air and/or water supply.
  5. Insert a coin to activate the timer and make any last adjustments needed.
  6. The unit is ready for operation.

TO OPERATE

  • Always make sure the discharge ball valve is closed or pointed in a safe direction before turning the air on. Ball valve can be shut off at any time during operation but should not be left unattended for long periods of time. Expect a strong blast when re-opening ball valve.
  • The unit has been tested and is ready to operate, the air pressure preset at 60 PSI. This is the optimum pump pressure. Test "as is" before making any adjustments.
  • The foam consistency knob is pre-set. To adjust foam consistency, turn the foam consistency needle valve counterclockwise for drier foam and clockwise for wetter foam. Make 1/4 turns only - do not overcompensate. Wait several seconds after each adjustment to see the results.
  1. With the foam wand in hand direct the discharge in a safe direction and open the discharge ball valve and the air ball valve.
  2. If the flow of foam surges, the needle valve is open too much or the chemical concentration is too weak, reduce the air flow by turning the needle valve slowly clockwise until the foam flow stabilizes. Or add more chemical concentrate.
  3. A medium-wet foam will give the best cleaning results! Very dry foam will NOT clean as well!
  4. When foaming is complete:
    • Close the discharge ball valve.
    • Promptly return to the unit and close the air ball valve.
    • Briefly re-open the discharge ball valve to relieve pressure in the hose.
     
  5. Rinse the work surface before the foam dries.

Unit Flow Rates

PSIGPM
601.20
933602-COIN.jpg
Troubleshooting Guide
Problem Possible Cause / Solution
StartupMaintenance
A) Air pump will not pump or runs with no output.
B) Foam surges and/or hose "bucks".
C) Foam output too wet.
D) Foam output too dry.
E) Cleaning results not acceptable.
F) Unit does not come on when coin is inserted.
1, 2, 3, 4, 7
1, 2, 3, 4, 5, 6, 7
1, 2, 3, 4, 5, 6
2
5, 6, 8
9, 10
11, 12, 13, 14, 15 16
11, 13, 15
11, 14, 15


17
Possible Cause / Solution
StartupMaintenance
  1. Inlet ball valve partially closed or air pressure too low.
    • Completely open air inlet ball valve.
  2. Foam consistency needle valve open too much
    • Adjust the needle valve slowly clockwise until foam stabilizes. Turn round handle slightly clockwise for wetter foam; open counterclockwise for dryer foam. Open a maximum of 1 turn.
  3. Discharge ball valve not completely open or Discharge hose kinked
    • Completely open the discharge ball valve / straighten hose
  4. Solution tube not completely immersed in chemical or container empty
    • Immerse tube or replenish chemical.
  5. Dilution too weak
    • Add more chemical to solution container.
  6. Improper chemical
    • Ensure product is recommended for foaming and/or the application
  7. Ice particles from condensation in air line — Air pump can periodically "freeze up” (stall) due to ice particles in the pump's exhaust (depending on air humidity & other factors)
    • WAIT several seconds to allow the ice particles to melt and blow out, at which time the pump will automatically resume pumping.
  8. Soil has hardened on surface
    • Always rinse foam before it dries
  9. Timer failed, not set properly or malfunctioned.
    • Replace timer. Set timer again, ensure the dip switches are depressed completely.
  10. May have electrical problems
    • Have a qualified electrician check electrical connections. Ensure circuit breaker (2 amp) has not been tripped.
  1. Solution strainer blocked
    • Clean or replace
  2. Air regulator failed
    • Clean or replace
  3. Air or water check valve(s) failed
    • Clean or replace
  4. Discharge hose wrong size or kinked (See REQUIREMENTS, page 1).
    • Straighten the hose
  5. Nozzle size too small or missing
    • See REQUIREMENTS, page 1.
  6. Problem with air pump
  7. Coin Acceptor failed or a coin jammed.
    • Replace acceptor or remove coin
PREVENTIVE MAINTENANCE: When the unit will be out of service for extended periods, place chemical tube(s) in water and flush the chemical out of the unit to help prevent chemical from drying out and causing build-up. Periodically check and clean chemical strainer and replace if missing.